What do you think of when you think of Christmas? It must be Santa Claus and reindeer. Today we are going to draw a reindeer.
This is a step-by-step tutorial, but it’s a bit complicated, but even a beginner can draw a realistic reindeer by following our tutorial.
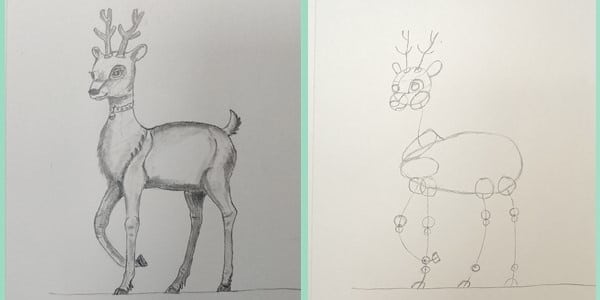
1. Draw a Reindeer – Auxiliary Lines
First, let’s draw a sunflower seed shape placed horizontally. This will be the torso part of the reindeer. Note the size.
Then, we draw a circle. This will be the head of the reindeer. So note the proportions to the torso.
Next, we draw the auxiliary lines of the reindeer’s limbs. Just pay attention to the curvature and the proportions.
Finally, we draw the auxiliary line for the reindeer neck. Note the curvature.
2. Draw detailed auxiliary lines
Next, we draw another small circle on the lower left side of the circular auxiliary line on the head.
This will be the auxiliary line of the reindeer’s mouth. Note the size.
Then we draw the auxiliary line for the reindeer’s leg joints, which are circles of different sizes. Note the size.
Next, we draw the two auxiliary ovals on the reindeer’s shoulders. Note the size.
Finally, we will start to divide the reindeer head circles. We will divide it into three parts: the upper, middle, and lower parts.
Then we will draw the auxiliary lines for the ears, eyes, and nose of the reindeer.
3.Draw a Reindeer: Outlining
Next, we finish drawing the auxiliary lines for the antlers and tail.
Then we’ll start outlining. This is the most exciting step. A realistic reindeer is realized in our pencils!
Eyes, mouth, cheeks, a little bit of realization.
Finally, erase all the auxiliary lines with an eraser! Isn’t it a great feeling of accomplishment that we have finally finished drawing a beautiful reindeer? This will be our best decoration for Christmas 2020.
4. Draw Shadows
Finally, start painting the light and shadow changes.
You can blend shadows with a blending stump or a cotton swab.